Sunday, May 29, 2011

It all came together


This one started with inspiration from a tag that I saw here on a layout. With this in mind I started pulling out bits and pieces from my stash. With a specific person in mind the sentiments came together. I am loving adding just a bit of detail to finish it off. I was surprised how quickly it came together.

Colour: sahara sand, chocolate chip, whisper white
Stamps: all about me, bubble wrap and remember this moment (kaiser), punctuation (kelly panacci), rough type (SU)
Finishing touches: tag stencil, eyelet labels, linen thread (SU), faux stitching, photo anchor (franchville)

Still trying new techniques


When something catches my eye while I have been blog hopping I don't usually get back to using the inspiration. So I have been bookmarking the ones I have seen and actually using them. It also means that when I post it I have the reference to link to.

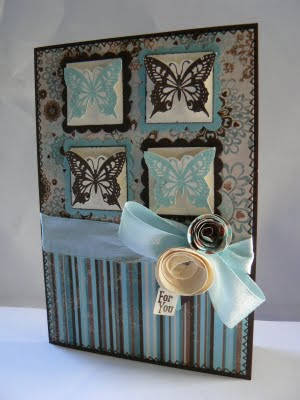
The inspiration for this one comes from Angela McKay at North Shore Stamper. Her card using the morning cup stamp set and Elegant Soiree DSP from Stampin Up uses my favourite colours and although I don't have the papers I do have a similar set from kaiser that I could use. I did get stuck with what to use in the boxes until I found my butterflies from Bella! I was originally going to use my new found crocheting skills for the flower but didn't quite get there. So tried out the rolled flowers that have been showing up of late.

Colours: early espresso, baja breeze, very vanilla
Stamps: impressions (bella!), vintage labels (SU)
Finishing touches: praire lane designer paper (kaiser), ribbon, square and circle scallop punches and linen thread (SU), faux stitching, square punch, label punch

Thursday, May 19, 2011

A definite favourite


I am loving being ahead on my card making as it means that I have more time to play and try out new things. I have been checking out Wendy Bond's blog at Bond Girl Bliss. I particularly love how she incorporates stitching and the way that she puts her papers together. With more designer papers at hand and a love of stitching, this was the result. The colours all started out with a button!

Colours: very vanilla, cherry cobbler, old olive
Stamps: retail therapy (elzybells), polka dot punches (SU), wedding cake (martha stewart)
Finishing touches: buttons, stitching, twill tape, linen thread, designer paper (my minds eye), upper crest border punch (fiskars)

Birthday to go to


I really must get to and make some birthday cards to have on hand as this one was made at the last minute. Although, I am getting well ahead with my regular birthday cards and enjoying putting more into them.

This one started out with the gorgeous papers from Bo Bunny that I got while on a recent trip to Auckland {a chance to check out stores there} I never turn down an opportunity to add to my boy themed papers. In the end I fiddled with placing things just too long and found that by adding the arrow it finally came together.

Colours: brocade blue, pumpkin pie
Stamps: billy and billy and lily accessories (PCS), punctuation (kelly pannacci), all in the stars (SU)
Finishing touches: stitching, blast off designer paper (bo bunny), button, linen thread

Wednesday, May 11, 2011

Something more feminine


After mostly boy layouts and cards I wanted to do something a bit more feminine. I love the work the Carole does {you can find her blog here} and decided to have a go at something using her style. I love the layering and the little details. This card was the inspiration.

Colours: always artichoke, early espresso
Stamps: best yet (SU) and impressions (bella!)
Finishing touches: distressing tool, patterned paper (unknown), designer paper (my minds eye),spiral punch (SU) ribbon, button, faux stitiching, rhinestones

Monday, May 9, 2011

Still organising


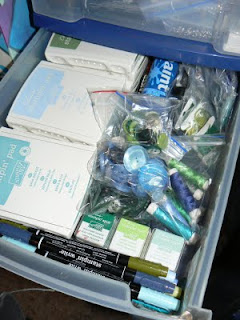
One of the challenges at Crop Creative {you can see some of my other challenges here} was to update something in your creative space. Since getting back to creating layouts I had been finding that I am frustrated when it comes to finding the bits and pieces I need for journalling and titles. Up until now I have been keeping things that are the same together eg stamps, punches, papers. But just as our stash changes so does our need to reorganise. Since putting together my stamp pads, pens and embellishments together by colour I have loved getting creative as I can immediately find what I want. So I did the same with my journalling bits and pieces. Now I have together my alphas, date stamps, words and label maker ready to do layouts. And I have more space in my stamp drawer.

Scrapbooking Day Crop Creative


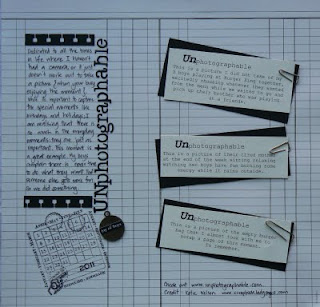
Well I did it. Even though we are a day ahead I managed to catch the action at the 12 hour crop. There was a new challenge every hour but you had until the next evening to complete the challenges and upload them into the gallery to be eligible for some stunning prizes. It is the first time I have been involved in something on line like this. It was fun. Great to see your own creations up with others. Superb inspiration. The challenges ranged from simple things like including journaling and using text to doodling {the girly layout},sketches {you make me smile} and a layout without photos {unphotographable - my favourite}. It allowed me to use some of my new products and push the boundaries on my style of scrapbooking.

Mothers Day Card


We made these twisted easel cards at Stamp Club. I gave mine a mothers day sentiment {pink}. So I then put together another in purple for my mother in law.

Colours: almost amethyst, white, concord crush
Stamps: natural beauty and vintage labels (SU), praire lane (kaiser)
Finishing touches: apron lace punch (fiskars) concord crush ribbon, buttons, dazzling diamonds, almost amethyst DSP

Thursday, May 5, 2011

International Scrapbooking Day

Looking forward to fresh inspiration and motivation on Saturday 7th March. I am going to be joining in the fun at Big Picture Scrapbooking with their online free crop day
I will also be starting it out with what is happening at Scrappin Patch to celebrate the fun seeing as New Zealand gets a head start on the day.

Inspired by design


I can never go to far without being inspired by something. I find it particularly helpful for coming up with ideas for male cards. I am always checking out my boys shirts for ideas as you can see here and here. This card was inspired by one of my husbands. It wasn't until I found Fiskars layer away stamp set that I was able to put it together how I wanted. I realise as I write that I should have taken a photo of the shirt but he's wearing it. {Will have to update this one}. It really gets the creative juices flowing pulling out stamps and colours to try and recreate something using what you have.

Colours: going grey, basic black, very vanilla, tempting turquoise, garden green
Stamps: layer away variety (fiskars), all about me (kaiser), circle of friendship (SU)
Finishing touches: stamps die (cuttlebug), pop dots, brown sugar embossing powder (american crafts)

Wedding card request


It has been my plan for a while to make cards to sell so when I get the chance I love creating something unique. This one is for my husbands social club for an upcoming wedding. You can see some of my other creations here and here

It actually started with wanting to try embossing transparency sheets with the hearts to combine with the sentiment from Kaiser mini stamps that I recent got. Once I got going it didn't actually fit with the design so will have to try it on something different.

It is always great hearing the comments back. The staff were impressed.

Colours: white, black, cherry cobbler
Stamps: sheet music and wedding mini (kaiser0, baroque motifs (SU), wedding cake (martha stewart)
Finishing touches: black and red embossing powder, divine swirl embossing plate and hearts and stamps die (cuttlebug), sheer ribbon, stitching, photo anchors, brads, distressing tool

I have been scrapbooking


Having spent some time on my older boys pages I have been working on my now 5 year olds pics. I put together my Revolutionize page packs and thought I would try something a bit different. Rather than completing them page by page I started by doing several just putting together the photos and papers with a few embellishments. Then I would go back and do all the titles and journalling and lastly the embellishments. And with life as it is I got as far as step one and not much further. I think I like the idea of it as you can focus on one aspect at a time but I definitely need to be scrapping more regularly to see the benefits ie: completed pages.

I have also been trying different ideas that I have seen and liked especially with embellishments. The layout of the train birthday gave me a chance to use my page dividers as well. At the moment I am using photos that I have but I am looking forward to printing some more recent ones which also means lots of photos. I have always tried to put as many on a page as I can but with digital I have loads more so page dividers are a great way to include the extras in an album without having to scrap them all. A while ago I had go at using them {you can see them here}

Related Posts Plugin for WordPress, Blogger...